Ice Cube Treasure Hunt

I was right! Yesterday school was cancelled and today too. What is one to do with all that snow and time off? How about a Treasure Hunt?

I just happened to be scrolling through my Facebook early in the morning, before the kids woke up and a friend posted a picture of some ice cube trays full of colorful ice and said she was going to hide them in the snow for a little scavenger hunt.

 I immediately fell in love with the idea and already had the necessary supplies on hand

Water
Ice cube trays
Food coloring
A snowy area

So I filled our Ikea ice cube trays with water and added food coloring to each one.

Then I put them in the freezer for four hours.

I was going to hide them in the snow, but that ended up not being necessary. I just picked out a living room size area in the ground and tossed the ice cubes up in the air, letting them land where they may.

The only problem was, we had 6 inches of snow and each ice cube sank like a rock being swallowed up into the white abyss. This heart shaped one was one of the only one I could take a photo of because the rest were completely invisible. 

It still worked out though. My little excavators immediately went to work looking for the rainbow treasure.

I helped point them in the right direction and showed them how to look by kicking through the snow and stopping when they spotted bright colors.

The challenge level with this amount of snow would probably be great for a youth group or even adults! Even though it was tricky for my group, and we only ended up collecting about half of the ones I made, the kids still really enjoy the whole experience.

They got so excited each time they discovered another fish, star or heart. The great thing about the whole idea of using ice is that the ones we couldn’t find are just going to melt away or maybe be a fun discovery for one of our dog walking neighbors.

If your kids are some of the thousands throughout the country experiencing back-to-back-to-back snow days then you may want to consider this fun little outdoor activity. It’s so easy, I threw it together without any preplanning at all! I will admit that next time I’ll ease up on the food coloring. I just used way too much and it got pretty messy. It washes off though, so it’s no big deal, but next time one drop will do.

All in all this was a perfect outdoor snow day activity that is fun for any age level. We’ll definitely do this one again some time.

Now time to warm up with some toasty hot chocolate and a hot bath! 
By |2015-05-18T04:19:18+00:00February 19, 2015|Crafts, Creativity, Uncategorized|6 Comments

Valentine’s Craft

I know I titled this as a “Valentine’s craft”, but love and hearts are in style year round, which makes this project extremely versatile.  You could help your child decorate a card for grandma, you could make a nice painting to frame and hang, or you could use it as an object lesson while teaching Bible verses about love. It’s inexpensive creative fun, and my favorite part is that it could work for almost any age. 
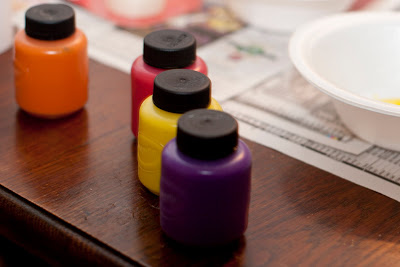
All you need is some paint, paper, bowls, and a couple empty paper towel or toilet paper rolls.
1. Choose your paint. I used Crayola washable paint and narrowed it down to 4 colors.
2. Pour a tablespoon of the paint into a bowl. 
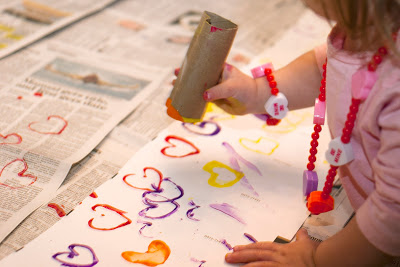
3. Have the child bend the tubes into the shape of a heart and tape each one into place to help them hold their shape. I used a paper towel roll and cut it into thirds.
4. Dip the rolls into the paint and use them as stamps. That’s it! 
You still have plenty of time before valentines day to start collecting those cardboard tubes. I will warn you that this craft can get a little messy, 
but the Crayola washable paint boasts that it is “washability you can trust” and it is. We’ve never had any trouble with it staining clothing, furniture, or anything else. 
 I hope your children enjoy this craft as much as mine do. 
Today I am linking up with the #showmethelovelinkup over at The Loflands
I would also like to say thank you to Rust and Sunshine for this fun craft idea. Lastly, I wanted to mention that these photos are a few years old (2012) and I have featured this craft before, but it’s such a hit I wanted to share it again. 
By |2015-05-18T04:21:51+00:00January 29, 2015|Crafts, Creativity, Uncategorized|11 Comments

1,2,3,4 I Declare a Nerf War

Baby it’s cold outside. I don’t know about where you live, but it’s 12 degrees out right now in the Cincinnati area and that’s warm compared to what it’s been. Twice this week my children have had  school delays because of ice and dangerously cold temps. So we haven’t had too much outdoor activity lately. However, all three kids got nerf guns for Christmas and J had the brilliant idea to facilitate a nerf gun challenge in our little apartment on Wednesday night. 
Here he is explaining the rules and the point system to the family. 

Z and J are notorious for sticking out their tongues when they concentrate.

SJ had the chance to do archery once and she loved it as well as the nerf gun. She is quite the marksman or markswoman? 

Ezie did okay with assistance for the first game, but by the second round he was disqualified. 

That’s right SJ, you may want to take cover, mama’s got a loaded nerf gun. 

Lastly, there is this photo. Out of dozens of shots, the bullseye was hit only one time and one time only. Who could the skillful participant be that victoriously earned the number one spot that evening? 
ME!? That’s right, I pretty much got lucky. That’s really the only explanation, but I did win, at least the first game. Thank you. Yes, thank you. I appreciate all the congratulatory remarks. 
Now then, if this looks like your idea of family entertainment then here are a few details of what worked for us.
In the past we bought really cheap guns from big lots. They worked fine, but they are not as powerful nor do they hold up as well. 
This time we used Nerf Fire Blasters along with the Nerf N Strike suction cup dart refill pack. They hit so hard that we had to back up to the furthest corner of our apartment to make it work. That means you will need to allow for 20 feet of distance in the area you want to play. If your suction darts don’t stick at first keep trying and give them a chance to break in. Ours worked better the second time we played.
The target was drawn on a window with liquid chalk erasable marker
The points system was 
1 point if your gun hits the window at all
  5 points if it sticks. 
The big points come in if you actually get it within the target. 

Everyone got 5 darts per turn and then we played for 5 rounds each. 25 chances total, and the person withe most points at the end wins.

Judging from our experience I would recommend the game for ages 5 and up.

So that was our little nerf tournament and we really did have the best time. I know they are all anxious to play again.

How are you holding up this winter? Anyone have cabin fever yet? 

By |2015-05-18T04:23:23+00:00January 9, 2015|Creativity, Family, Parenting Tips, Uncategorized|7 Comments

Melted Snowman Cookies

I’ve seen several variations of this recipe floating around on Pinterest. The one I used was from Somewhat Simple and she gives a wonderful tutorial.

All you need is

1 dozen sugar cookies, baked and cooled.

12 large marshmallows

white frosting 

Decorating Icing Tubes in Black, Red, Green, Blue and Pink

Optional: chocolate sprinkles, red candy, mini marshmallows

Instructions

    • Melt your white frosting in the microwave at 30 second increments so it is runnier than normal.
    • Spread the white frosting over each cookie using the back of a spoon. Let some dribble over the edges for a “puddle” look.
    • Place marshmallows on a microwave safe plate, then heat in the microwave for 30 seconds. Watch the marshmallows as they cook and stop the microwave as soon as the marshmallows start to get puffy. Do not let them double in size.
    • Spray your fingers with cooking spray, and carefully pull the marshmallows off the plate by the base and set them on top of the frosted cookies.
    • Decorate as you’d like with the colored frosting

The idea behind it is that you make a sugar cookie shaped like a puddle, covered with icing, and then topped off with a  marshmallow. What makes the blobs turn into snowmen is the toppings and this is where you can really get creative!

We changed it up a bit by using mini chocolate sprinkles for the faces, and some candies for buttons (and some of the noses). I have seen so many variations including the addition of the marshmallow snowball which I incorporated.

I have also seen resees cups for top hats or edible markers to draw the faces on. The possibilities are endless once you’ve got the basics.

My sister-in-law and I had a great time decorating these and of course, they are a hit with children.

I think Holiday cookies are one of my favorite things. By the way, I have been loving the feedback on the Andes Mint cookie recipe I posted last week.

           “These cookies are awesome and so easy! Thanks for the recipe. Seeing that I accidentally bought a box of brownies instead of cake mix, I went ahead and used that instead. I cut the vegetable oil down to 1/4 cup, added 3/4 c   flour plus 3 Tbs water. Then I added 2 eggs just like the recipe called for! These turned out perfect:).”
– Mels @bloglikeadog


“I made these over the weekend and they were a huge hit! Everyone loved them and they are so easy, moist and delicious! Thank you :)”
“I’ve made the mint ones twice now! They’re my new go-to cookie! Thanks for sharing!!”

That’s what makes me happy about this little Christmas series. It’s simple little things that I have tried as a busy mom with three kids and not a ton of resources. I would like to think that the crafts and recipes I am showcasing are for regular messy families just like mine. Although, clean and tidy families are welcome to try them too. Wink.

By |2020-12-02T15:59:26+00:00December 18, 2014|Creativity, Uncategorized|2 Comments

Personalized Gift Tags Using FaceBook Photos

For day two of 12 Pinnable Days of Christmas I want to give you some tips for making your own photo gift tags. Although, the title could just as easily be “How To Save Photos From Facebook” so if that’s what you are looking for, you’ve come to the right place.

I have been doing customized gift tags using photographs for a while now. I enjoy how personalized it is. Not only that, but it’s convenient since my husband and brother have the same name, and his wife and I have the same name. Yes it’s confusing. This is another reason that bypassing names works well for us.

There are various ways of printing photo gift tags.

1. Cut out printed photos and glue them to a gift tag.
2. Design your own with photo editing software or do it all online with pic monkey  
3. Print photos and cut them out using a downloadable template

If you decide you want to tackle this DIY project I have one major tip for all you Facebook users. When looking for a decent photo of your gift recipient consider downloading one of their Facebook photos rather than browsing through the hundreds or thousands of photos in your personal digital photo collection.

It sounds simple and it is. But I want to explain a little further, because it’s more than just “right clicking” the photo and doing a “save image as”. If you do this option it isn’t going to be the high res printable version. For more on what I mean by this you can check out my post on Facebook to the Rescue.

The proper way to save images from someone’s profile page can be achieved in 8 simple steps. It’s so simple that it’s really one step (Download photo from Facebook. Done.) but I am going to break it down to a painfully detailed process for those that are technologically challenged. Especially since step 6 is so sneaky!

1. Go to the page of the person you would like to print out a photo of. If you use Facebook then you already know how to do this. I am going to use my own profile page so that I don’t violate anyone else’s privacy.

2. Once you are on their page then click on “Photos”.  

3. You could just start browsing away at this point, but to cut to the chase and spend less time searching  just click on “Albums”
4. Once again you can choose any album and search away, but let’s keep it simple and scroll down until you see  “Profile Pictures” because this were most people keep their favorite selfies. 

5. Next choose which photo you think will work for your project and click on it. 

6. When you scroll over the photo a menu will appear at the bottom and you will see a button for “Options”. Click on it.

7. A drop down menu will appear and you will want to choose “Download”

That’s it! Once you have your photos saved you can move onto your gift tag project. 

*

I have had wonderful feedback from these gift tags and I am sure you will too. It’s just one more way that it truly is a joy to give! 
*

*The above presents were wrapped with either Trader Joe’s bags or decorated by curling wrapping paper to make bows. For more gift wrap ideas check out this post.

By |2015-05-18T05:01:19+00:00December 10, 2014|Crafts, Creativity, Uncategorized|7 Comments

Embracing Your Child’s Mistakes

I pray you’ll get caught
doing things wrong—before they get too big
I pray you’ll fail—in
things that don’t matter

I pray you’ll have to say
you’re sorry—and get really good at it, so that when the time’s right, you can
always find the courage to say the words

I pray you’ll cry, really
hard—so you feel free to express both tears of anguish and tears of joy

I pray you’ll get
lost—and discover you have the Compass within to help you find your way
The above lines are
excerpts from Lisa T. Bergrens Upside-Down Prayers for Parents. She wrote a devotional
series based on these upside down prayers in which she explains, 
“It’s our instinct as parents to shield our children from harm.
But our true responsibility is to raise children equipped to live well for God
even in the midst of struggle. Upside-Down Prayers for Parents encourages
us to pray for our children in ways we may never have before”
YES! That is exactly what
Teachable Parenting is all about. The book Love and Logic even states
“How do Love and Logic parents look upon their children’s mistakes? With great joy! Rather than get angry or frustrated they see mistakes as opportunities for their kids to think. They ask questions, wait for answers, and make heavy deposits into their children’s wisdom accounts.”
Can you imagine embracing your child’s mistakes to the point that you prayed for these learning opportunities? Can you imagine being joyful about your child coloring on your walls so that you can train them to respect property and prevent them from being destructive elsewhere? The idea behind Love and Logic and Teachable Parenting is to turn misbehavior into wisdom when the price tag is low. That means having your son lie to you about washing his hands is bad, but aren’t you glad you get to teach him the importance of honesty before it turns into something that gets him in trouble with the law or causes him to loose his job? Dr. Faye says the road to wisdom is paved with mistakes. That means that the more your child is pushing the envelope, or testing boundaries, the more opportunity you have for teachable moments. 
So how do you turn these mistakes into teachable moments? We’ll talk more about this as we continue on in this series, but these are the basic steps as shown in Love and Logic:
1. Offer empathy, understanding, and unconditional love first and foremost
2. Allow them to struggle and solve their own problems
3. Encourage children to learn to succeed through personal thinking and
learning
I’ll give a couple real life examples for you. My 4 year old stole a candy bar from the store.
It’s no big deal, we had never really discussed theft, but he knew he was being
sneaking so I hauled him to the store manager. Then I winked at the big bad police and said that my son would like to return the
candy and hopefully you won’t have to call the police this time. That was a
low price mistake. Does that mean he will never steal in his life, I can’t guarantee that, but so far he hasn’t been a repeat offender. Does that mean a
child that doesn’t get caught in a robbery can never learn? No. I think you get
the point though.
Another lesson. Some of you have heard the story about when I tried
to set up a date in middle school and my my mom listened in on the phone call
and called me out for lying (the story is here if you are curious). That could
be devastating for a parent. Your precious goody-two shoes daughter was going
to sneak out with a boy behind your back and then lied to your face about it!
The truth is though, it was a low cost mistake and I always tell people that
story because I am glad I didn’t start dating that young. I could have run to
high cost mistakes in the boy department had my life taken a different turn at
that point.
Now, maybe you are thinking you feel like your three year old has
made enough mistakes this week and you are tired and you don’t care if the
mistakes are rock bottom clearance prices you don’t want to deal with anymore.
All I can say is hang in there. This too shall pass (I’ll talk more about that
later). Or maybe you have a 13 year old and he/she is getting into trouble in a
serious way. Forget the low price tag these mistakes are costing you monetarily
and emotionally! My advice since I have never been in your shoes yet, is to
check out the books I’ve mentioned because they have a lot of great
strategies for situations like yours.

So, the next time your child makes a mistake smile and thank the Lord for the teachable moment. I dare you.
This is Day 7 of a 31 day series. For the rest of the days click HERE.
By |2015-05-18T05:05:28+00:00October 6, 2014|Parties, Uncategorized|3 Comments

Our 5th Annual Cow Day

Chic-Fil-A time, cow day, dress-like-a-cow, free food, cow appreciation day- whatever you want to call, it it’s a fun time and something that is starting to become one of my favorite days of the year!

This year I was saddened when I realized Z would be out of town for cow day. I had already planned on painting the kids faces this year and almost considered changing our whole summer schedule around  the event just so that he could be a part of the action. That was unrealistic though. So instead I decided we could still dress up and take pictures like we do every year, but we would do it before cow day at my aunt’s barn.

The weather was gorgeous and the children really ate up the chance for some extra special pretend play.


Then later they ate up the free food when all but Z went in dressed like cows on July 11.

On the left is my niece for her first cow day wearing the same dress SJ wore 5 years ago on her first cow day (pictured right). It was so sweet! 


Between all the free meals we’ve gotten over the past 5 cow appreciation days, my family has ordered at least $75 worth of free Chic Fil A. That’s a pretty sweet deal. I am cheap, so I usually just get a couple kids meals and share with the kids. I don’t mind because it’s still delicious, but on cow day you better believe I get myself in full garb and I order a chicken sandwich meal with a LEMONADE all for me. YUM.

The whole experience just makes me smile! I’ve decided at this point it’s worth it for me to come up with a permanent costume. Every year I dress in white and tape black spots to myself, but I think next year will be different. Yes I am already planning for next years cow day. I am a true CFA fan. Moo.


By |2015-05-19T20:08:52+00:00July 28, 2014|Creativity, Frugal Living, Uncategorized|1 Comment

Independence!

I love the 4th of July, it is such an uplifting, lively holiday. On Sunday we all wore red, white, and blue. It was a last minute thing. Since we made the effort to coordinate I asked my sister in law if she could snap a quick picture of us. Ezie was literally asleep in this photo and we had a slew of unattractive vehicles (like my own) in a very bland looking parking lot behind us. I still loved the photo though, as we have very few of all 5 of us. So I learned how to photoshop around strands of hair so that I could tweak the background, then I made some color adjustments, added the text, and BAM- I’ve practically got a personalized greeting card now.

Here are some throwbacks to other times that we wore patriotic colors. 

2010
2011
From our family to yours, HAPPY 4th of July!!!
By |2015-05-19T20:14:19+00:00July 5, 2014|Creativity, Uncategorized|1 Comment
Go to Top